Multiplying Polynomials Using the Box Method Foldable
I created this set of notes for my Algebra 2 students over multiplying polynomials using the box method. In later years, I turned it into a multiplying polynomials using the box method foldable.
I’ve been impatiently waiting since August to introduce my Algebra 2 students to the box method.
I used the box method last year with my Algebra 2 students to multiply and divide polynomials. Some of them are taking pre-calculus this year, and they came back to tell me that they had taught the method to some of their classmates!
As soon as I heard how excited they were about having done that, it just made me really excited to teach this year’s group of students the magic that is the BOX.
I typed out these notes with steps for the box method for multiplying polynomials.
This is a first. Usually, I just show my students how to do it. But, I do recognize the importance of them having something to look back on if they forget the process.
This was a first attempt at writing out the steps. I’m sure these will morph and grow over the years like the rest of my notes do!
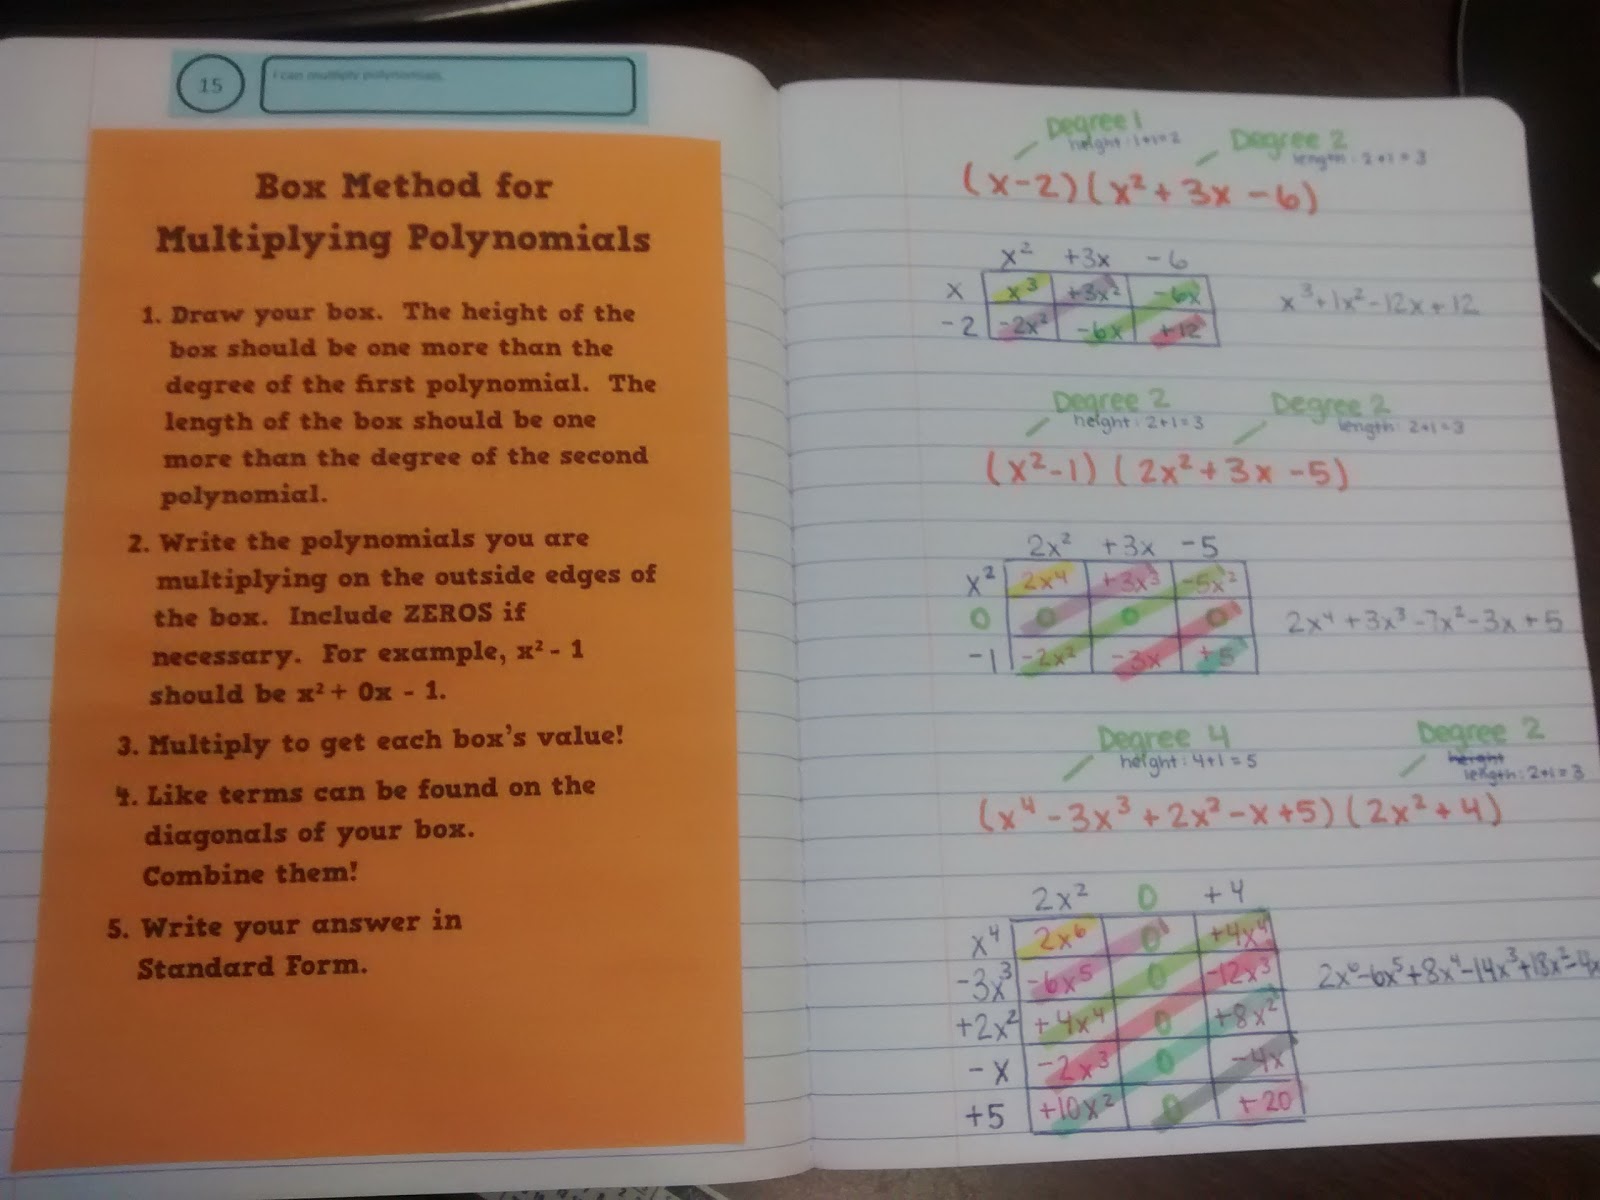
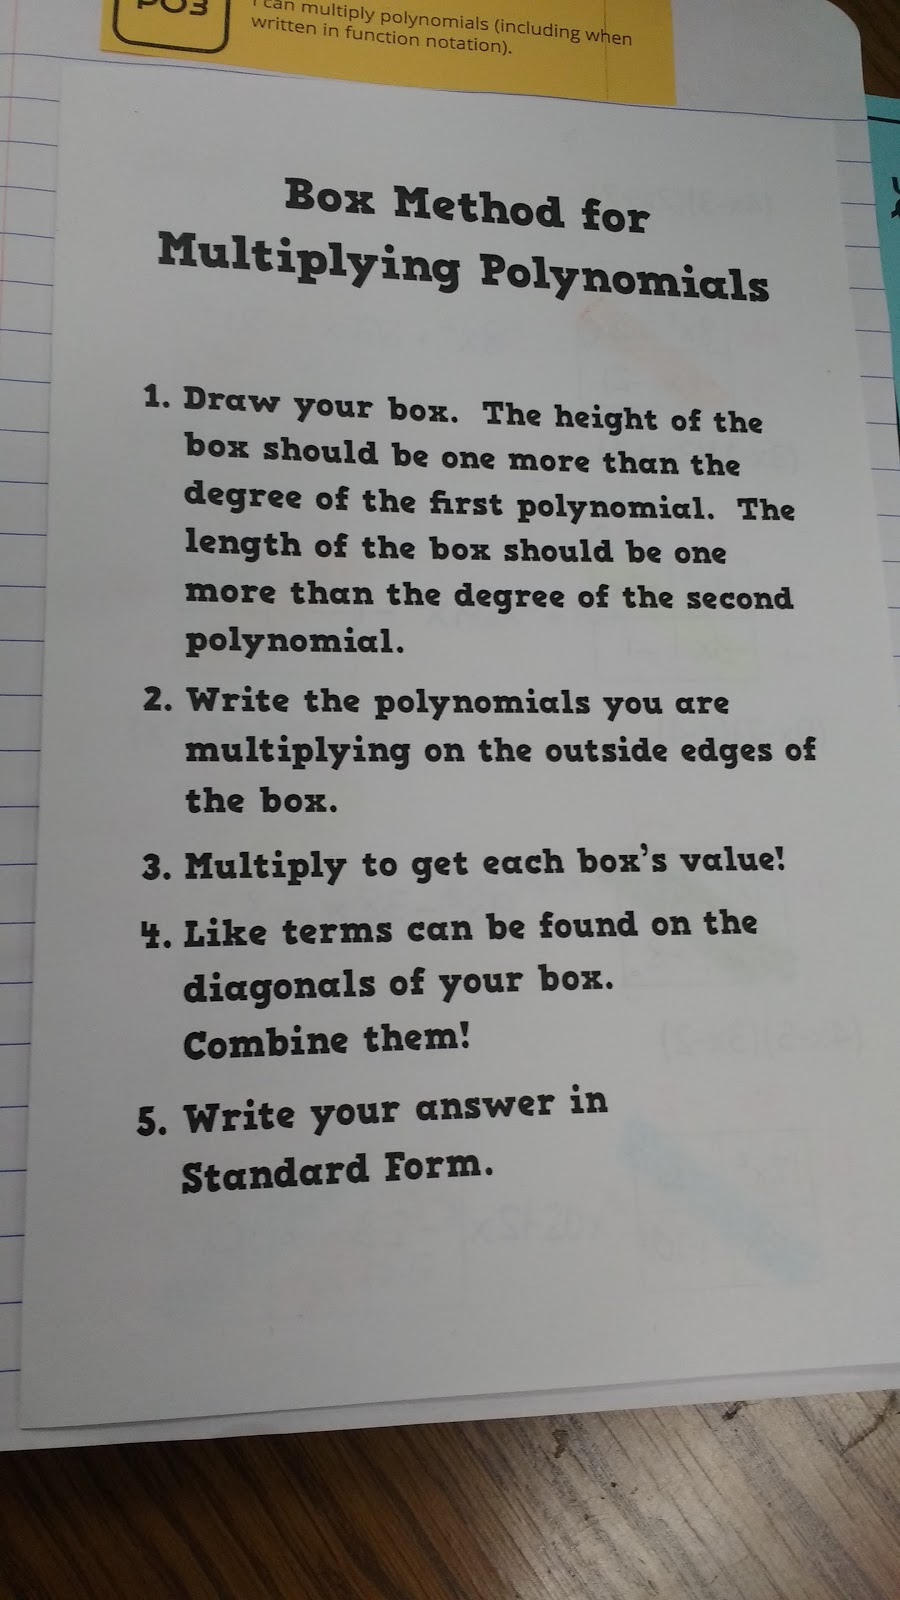
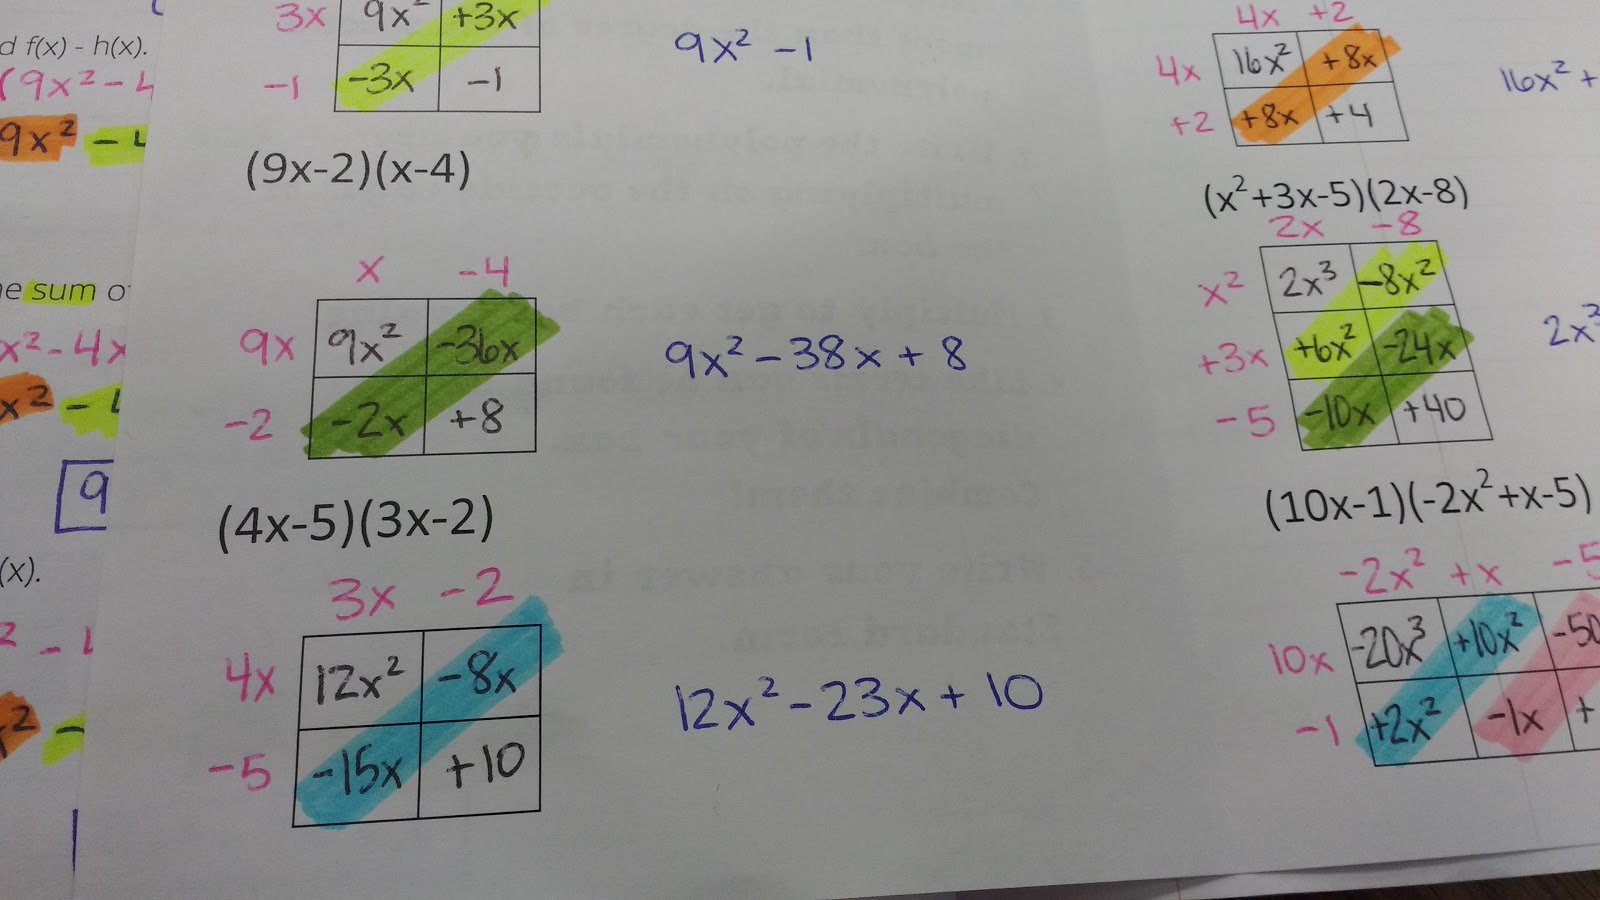
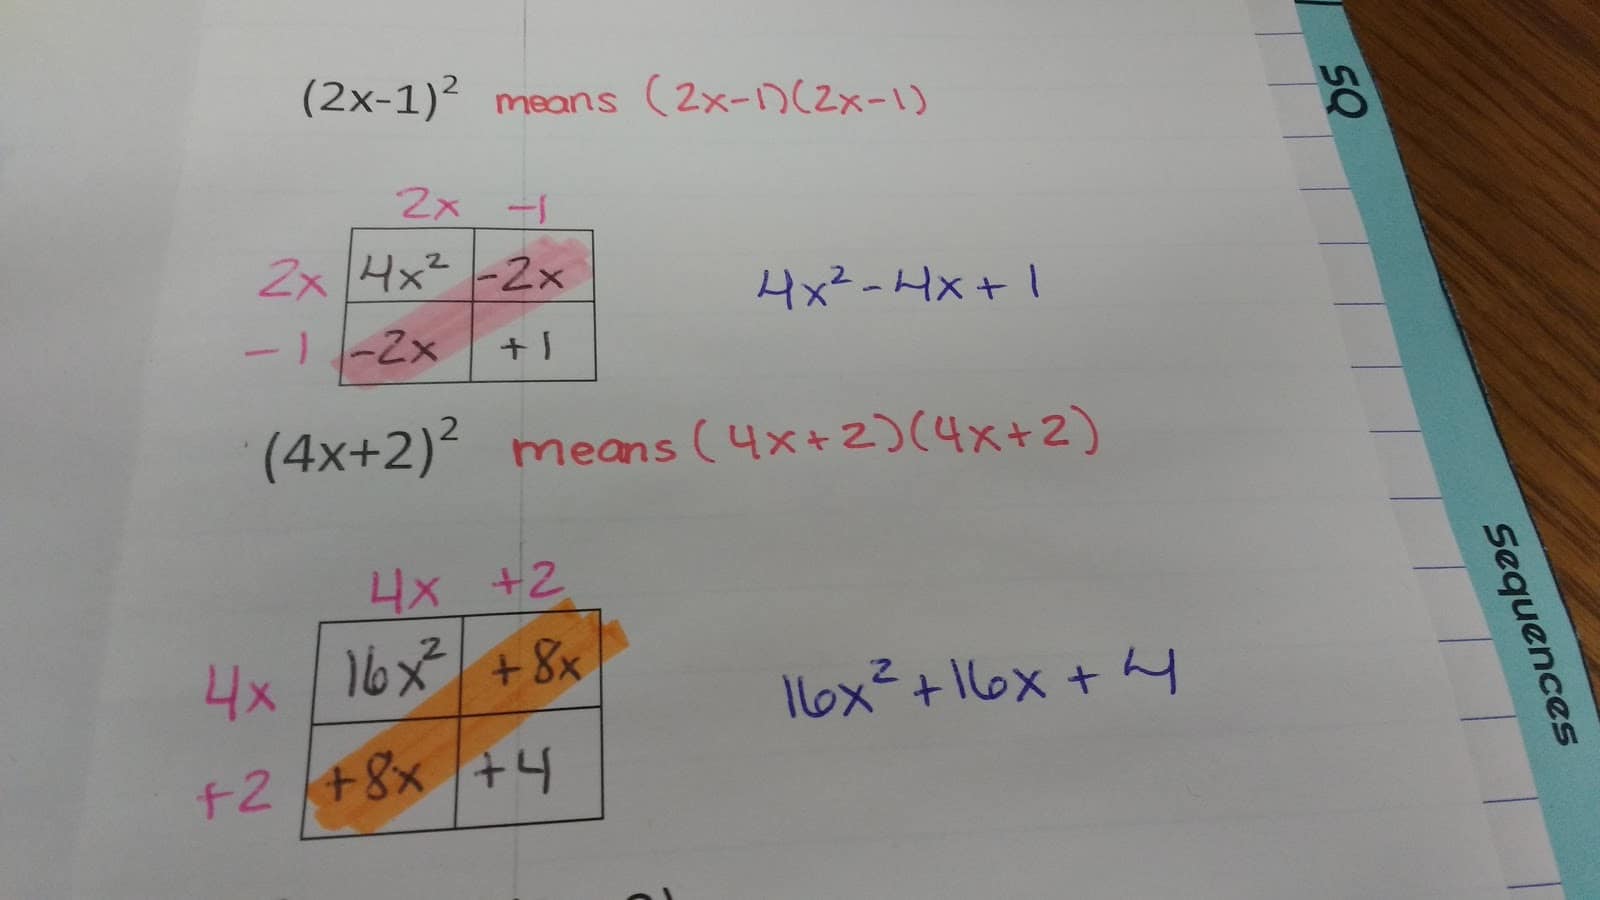
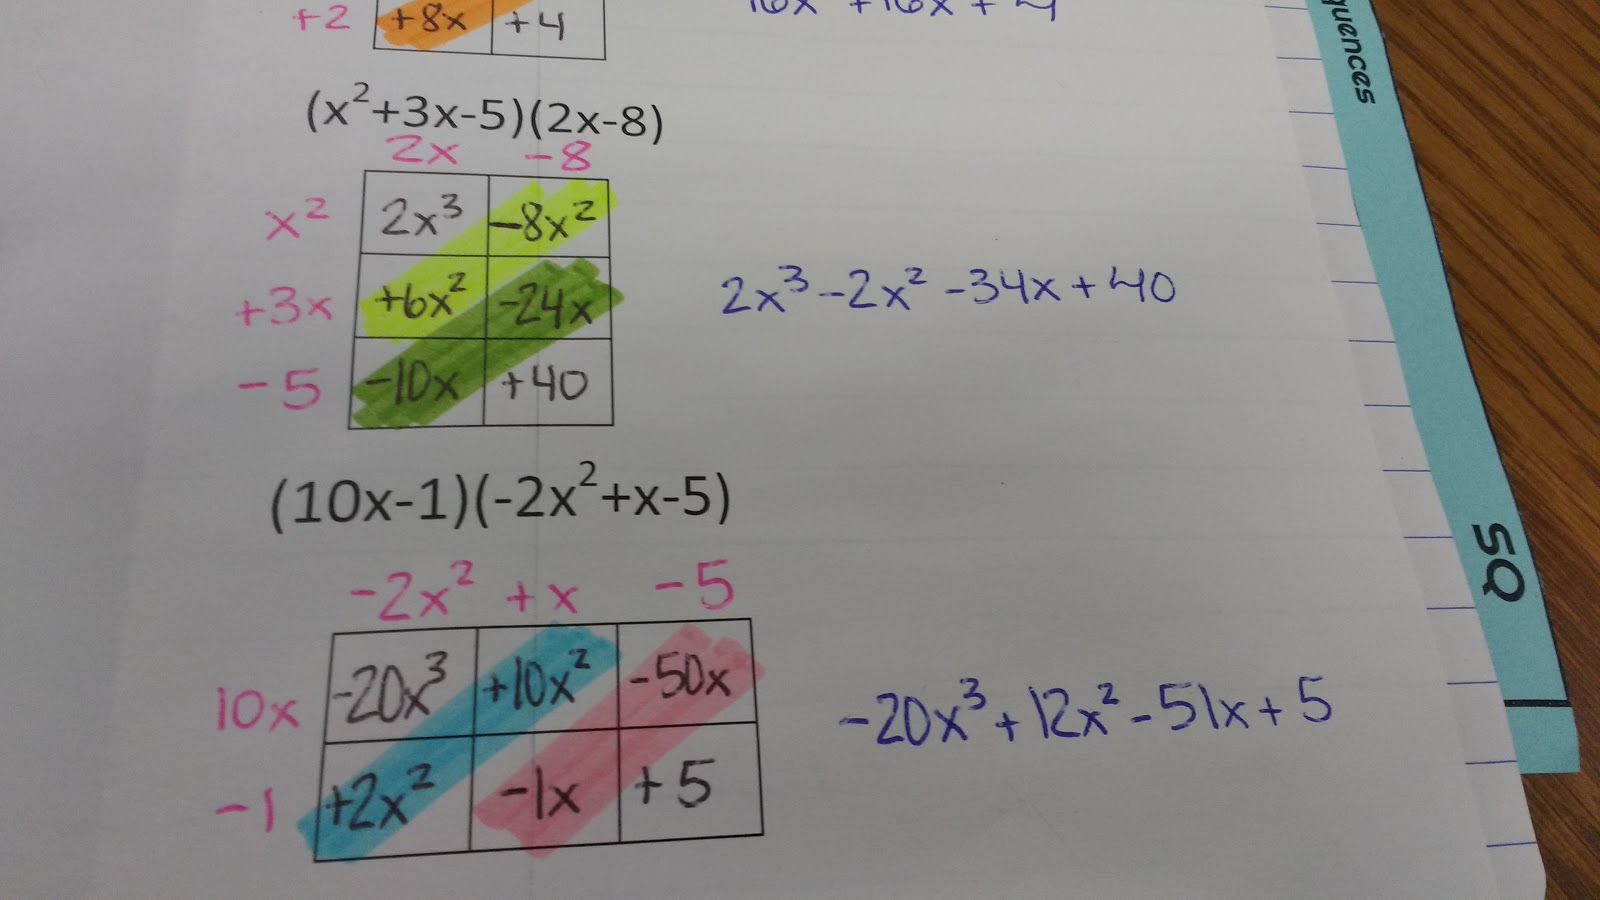
Steps for Using the Box Method for Multiplying Polynomials
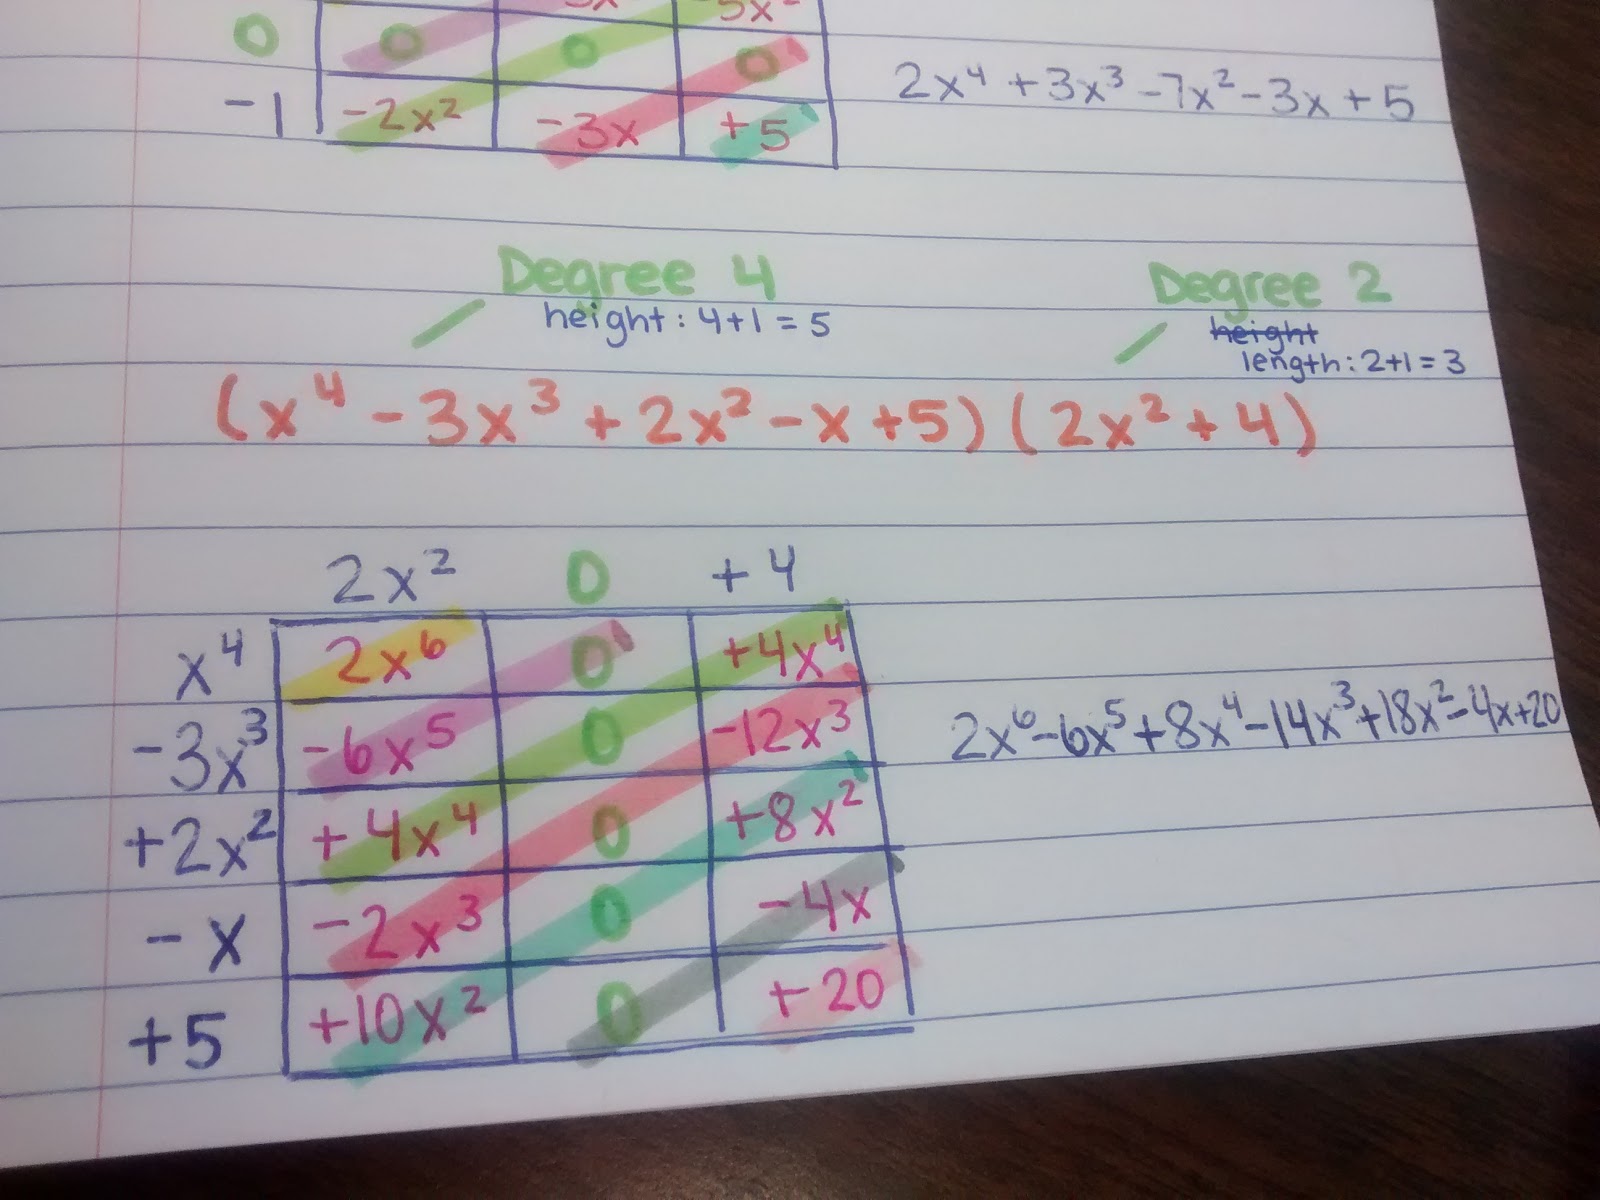
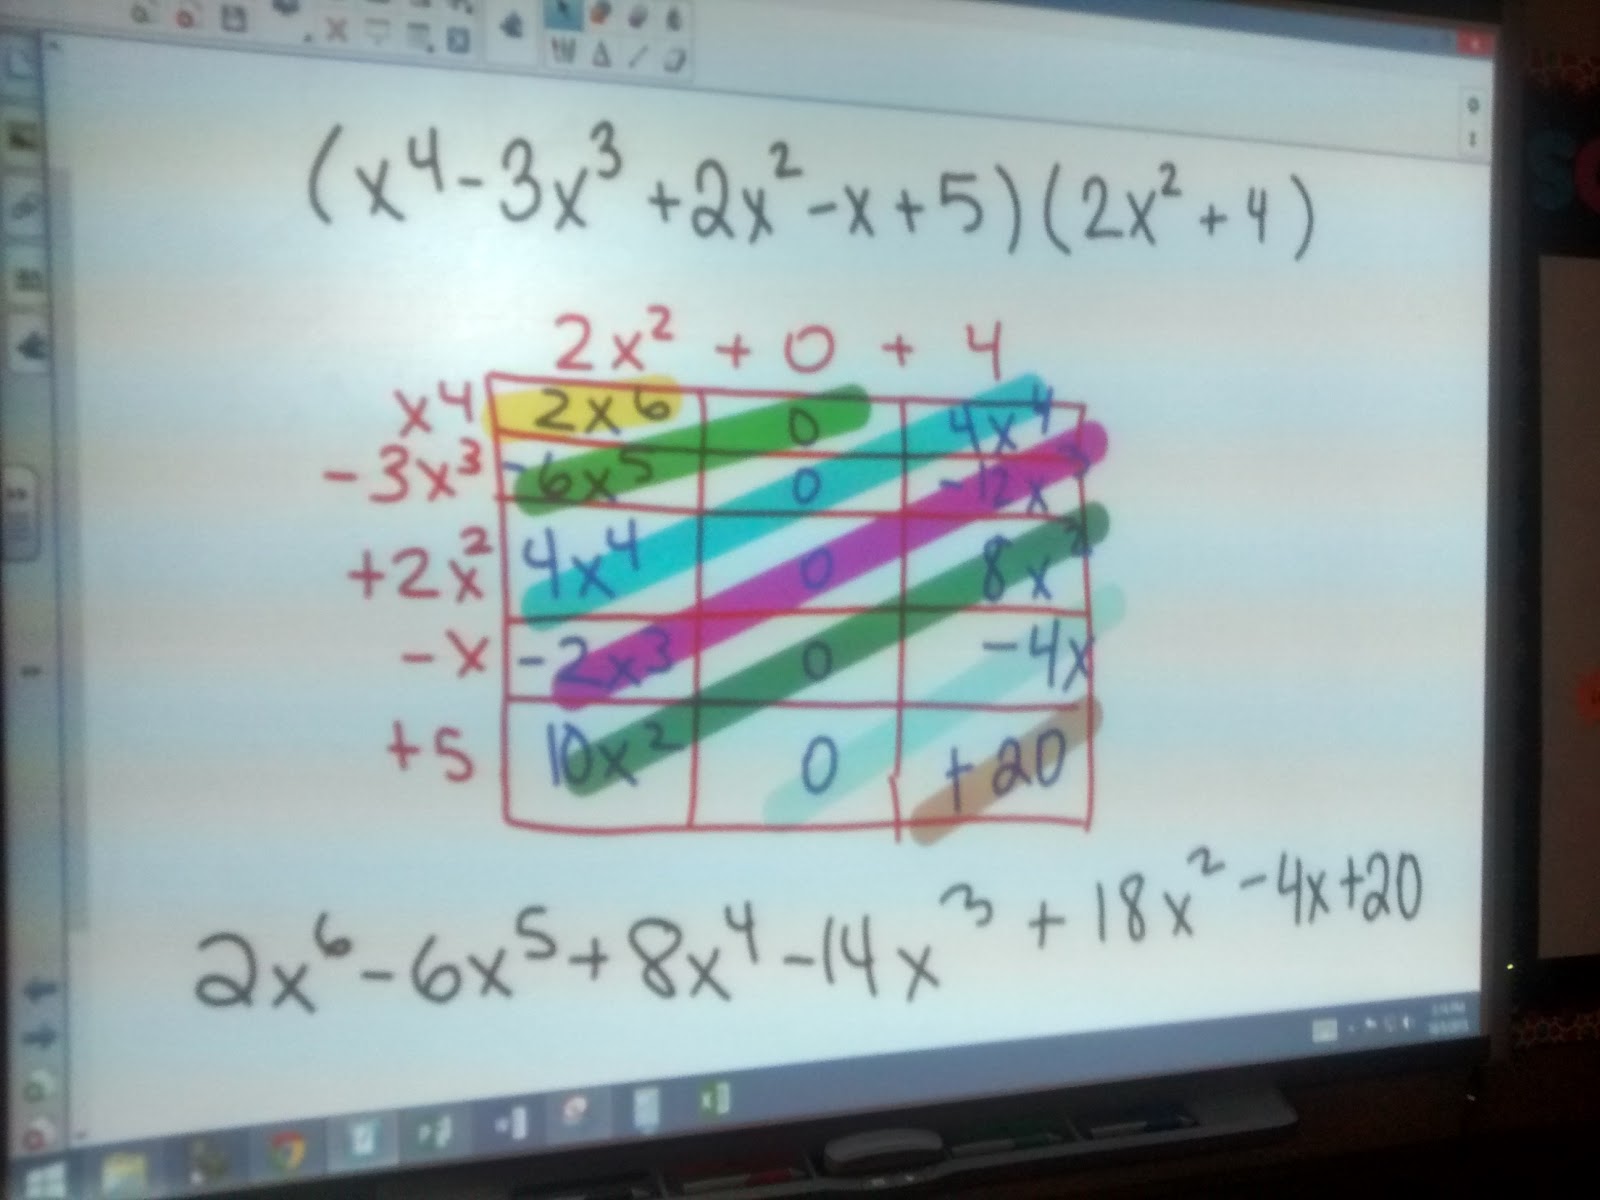
- Draw your box. The height of the box should be one more than the degree of the first polynomial. The length of the box should be one more than the degree of the second polynomial.
- Write the polynomials you are multiplying on the outside edges of the box. Include zeros if necessary. For example, x^2 – 1 should be x^2 + 0x – 1.
- Multiply to get each box’s value.
- Like terms can be found on the diagonals of your box. Combine them.
- Write your answer in Standard Form.

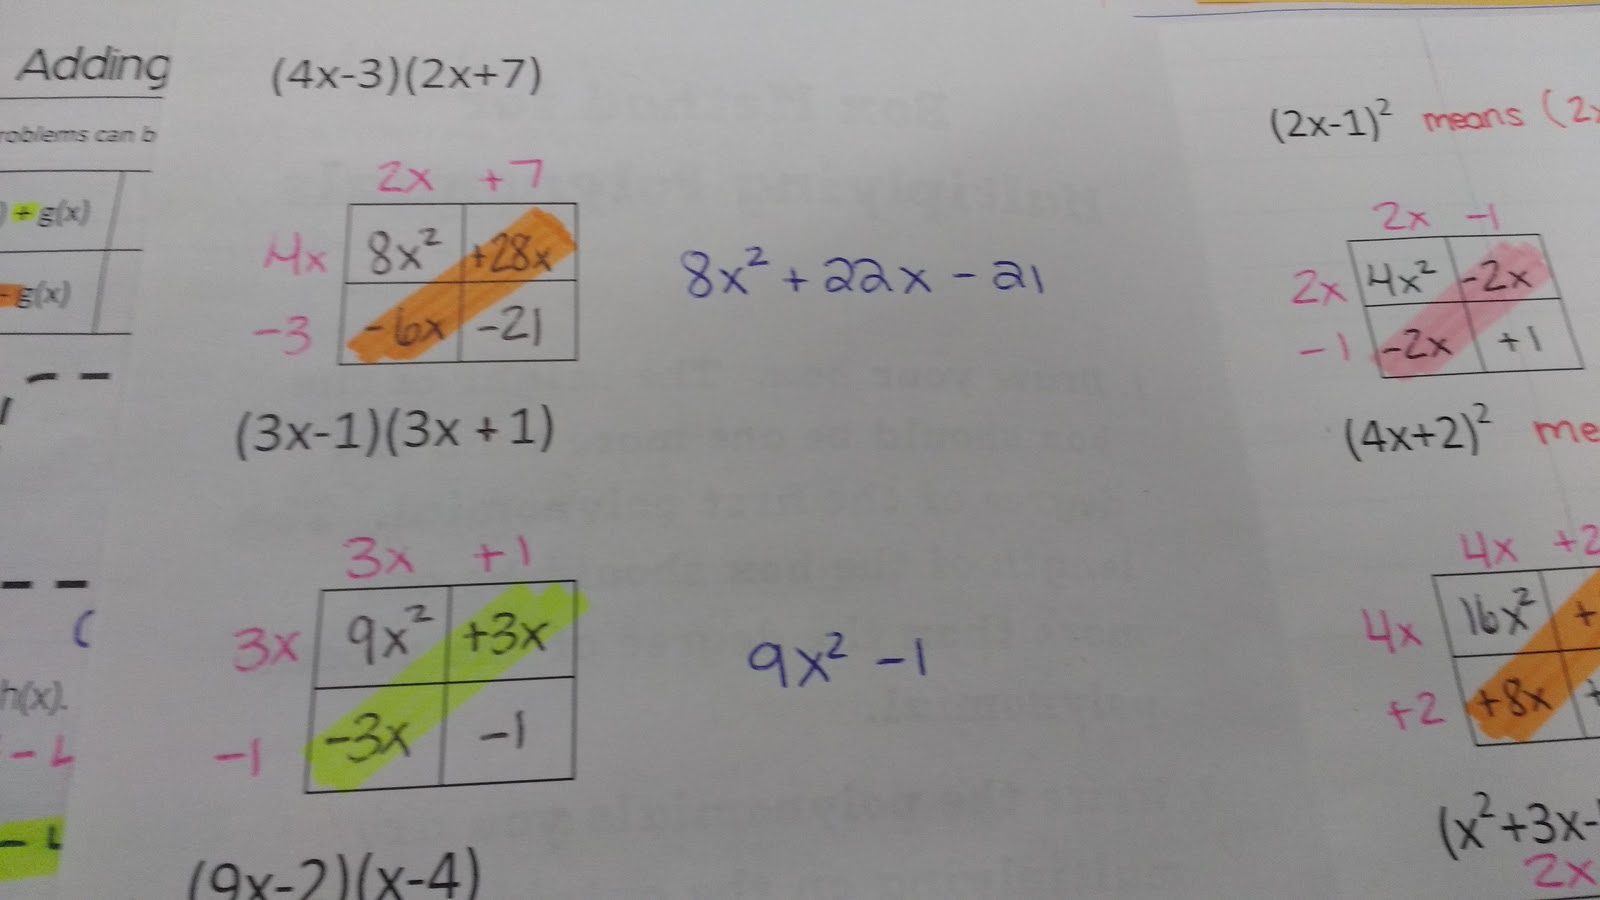
Then, we did some practice problems together.
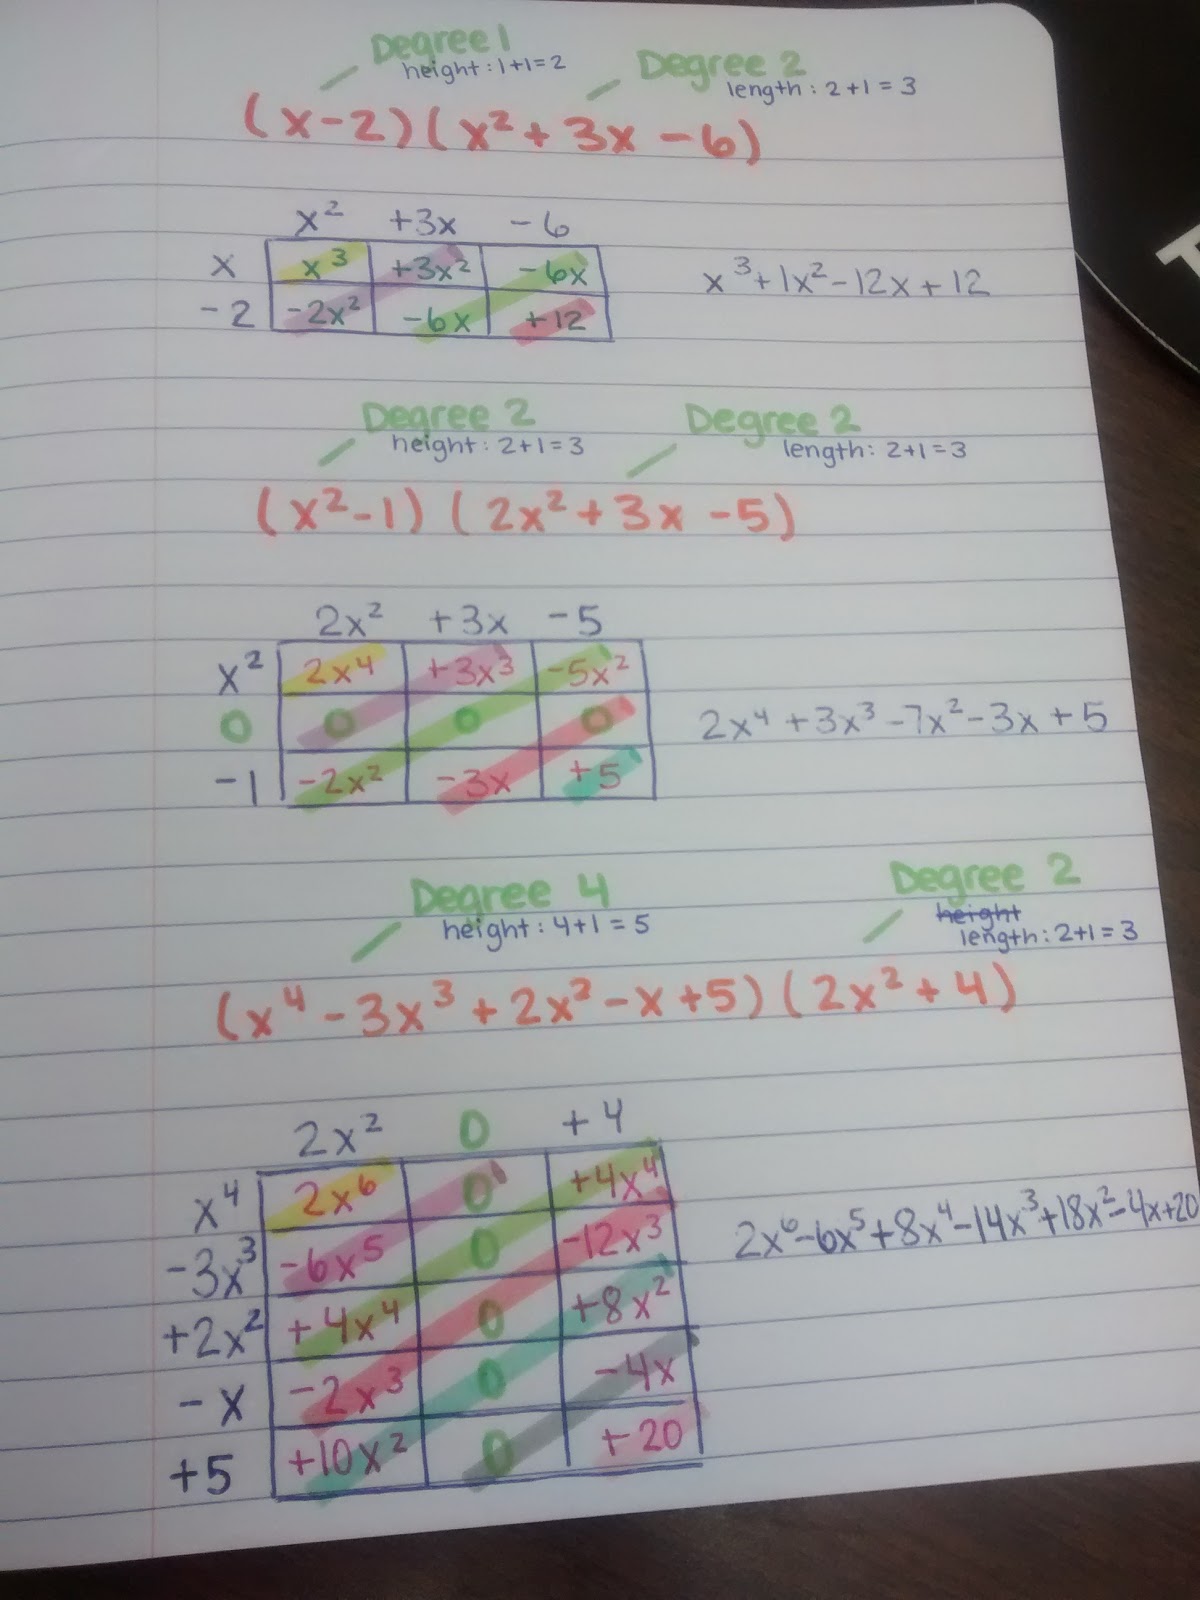
I had them note the degree of each polynomial to see if it has any 0 terms in it that need to be taken into account.
At the multiplying stage, you can leave out the zeros, and everything will work just fine. But, the like terms won’t always be on the diagonals.
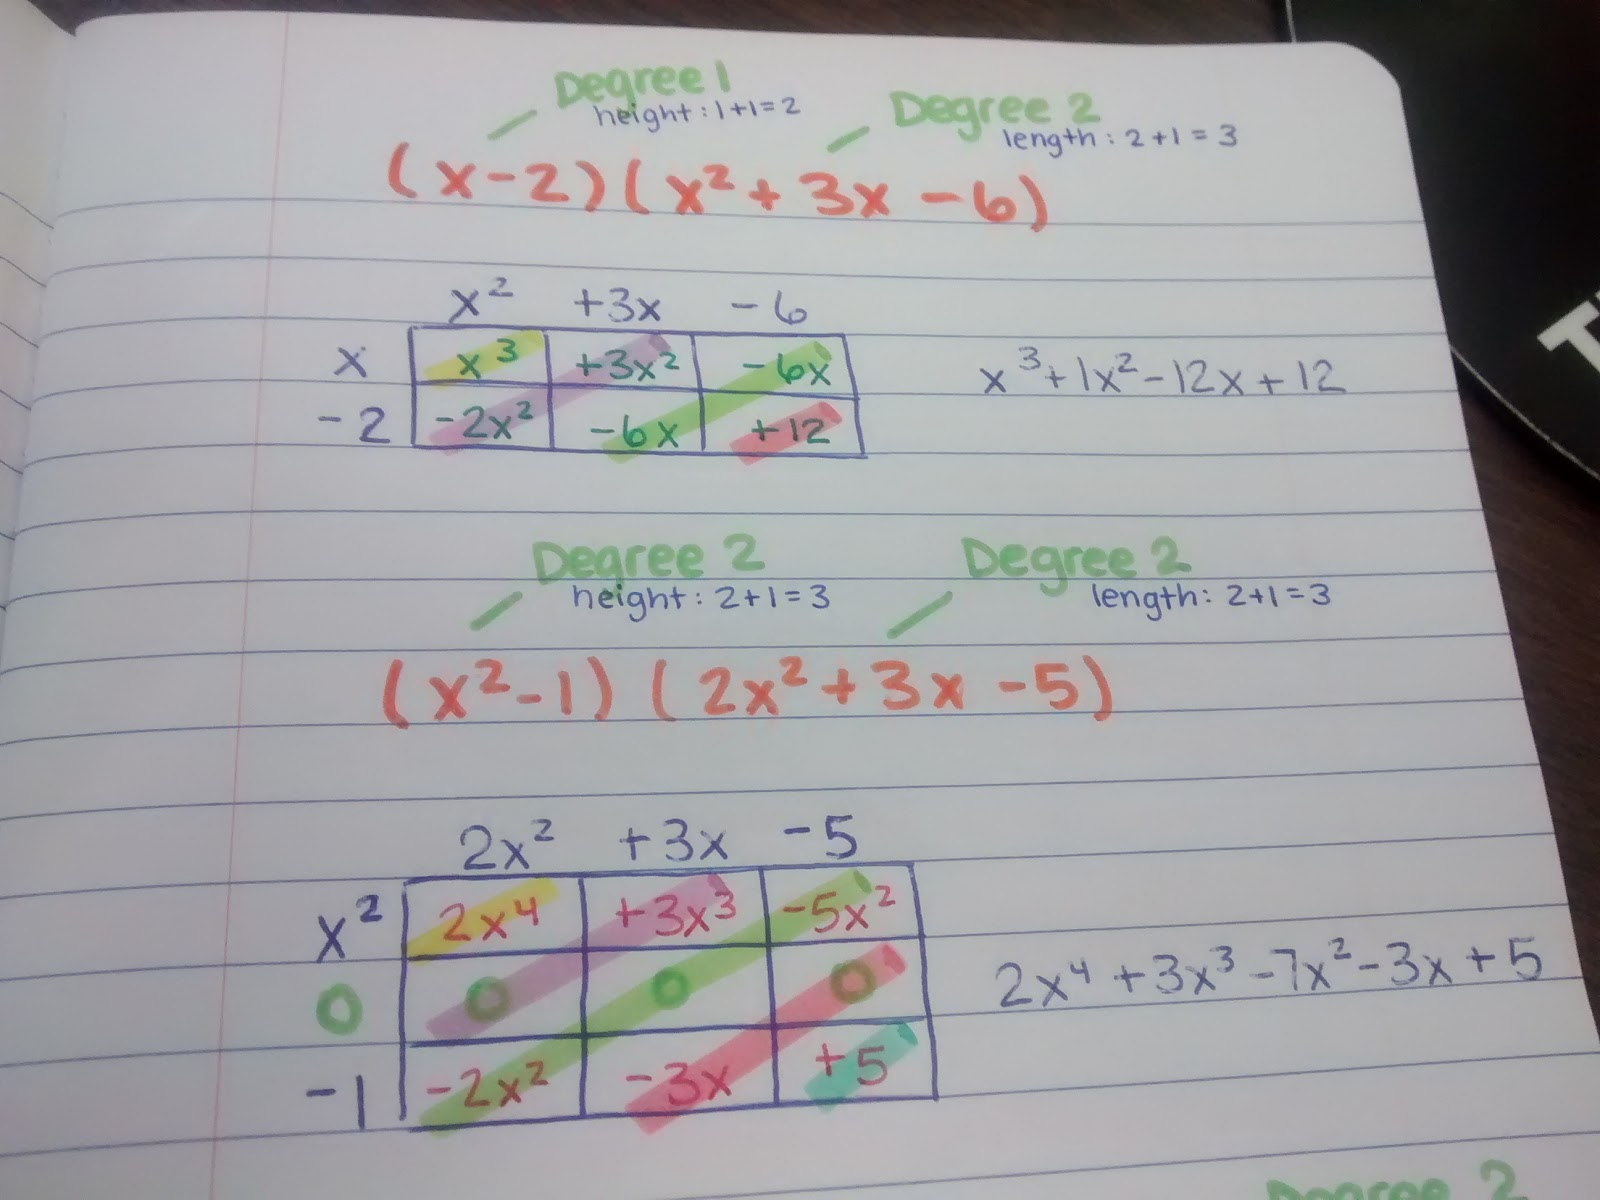
Plus, having the zeros is essential when using the box method to divide. So, I want my students to get in the habit of including the zeros now.
I think the moment when my students really started buying into this method was when we color-coded the diagonals and saw the like terms. If all the terms in a diagonal are not like terms, we know we made a mistake somewhere!
One student raised his hand to say he liked this method a lot better than the way a previous teacher taught him with drawing arrows all over the place.
That’s the way I was taught, and it worked just fine for me. But I’ve seen students forget to distribute a term to every other term so many times.
Drawing the boxes (if drawn correctly) shows students just how many times they have to multiply.
They often get frustrated trying to figure out where the zero rows/columns go. But, they definitely get a sense of satisfaction when they get to fill in that whole row or column with zeros!
Here’s what the problems end up looking like when we work them out on the SMART Board. My boxes were a bit wonky, and it definitely showed when I used the highlighter tool…
Multiplying Polynomials Using the Box Method Foldable
In future years, I turned this into a multiplying polynomials using the box method foldable.
I typed eight different multiplying polynomials practice problems inside the foldable.
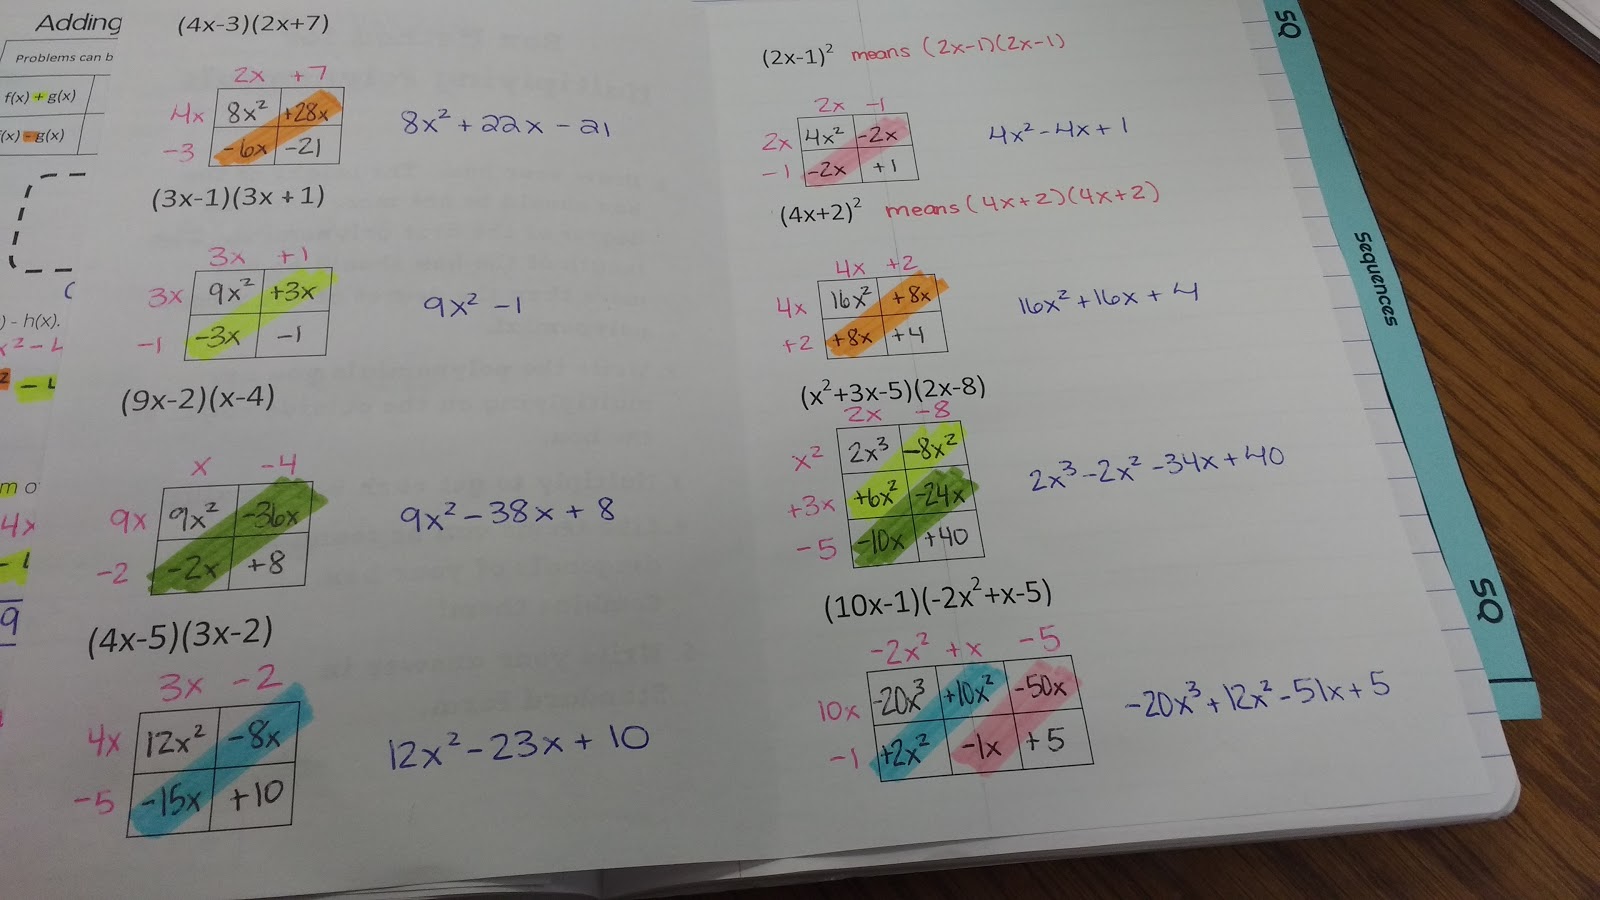
I also pre-drew in the box diagrams for each problem. This led to much more organized work from my students!
Looks good! Do you also connect this idea to the larger concept of arrays, or that it represents rectangular area? It might be neat to lead in to this with a simpler version that just has numbers in expanded form, like 400+50+3 x 200+70+8.
Oooh! I like this idea!
I love that you are incorporating the learning goal from your Unit TOC at the top of each page. Should help students 'make the connection'.
Thanks! I'm hoping it is helping my students. Some day it seems like more work than it's worth.
I do this too (except we hand write it). Communicating the learning target to the students is a big deal to my district so this is one way I make sure we do that. Plus, like you said, it just re-emphasizes what these notes are helping us do! 🙂
Have you ever seen the box method used for completing the square? It is pretty awesome 🙂
I'm not sure if I have. Do you have a link handy?
I would be interested in this, too!
I'm curious about the box method for completing the square too!
This caught my attention when you tweeted it, but not until you blogged was I convinced to actually try it. My point: keep the blog posts coming! The additional characters vs twitter are definitely helpful. 😉
Thanks Teri!
I love this method. In fact, I've started using a box method to teach distributing to my 7th and 8th graders. They like to complain about it now, but they are more accurate and I know that they will be thanking me in Algebra and Algebra 2.
I like the idea of starting this in 7th and 8th grade!
Totally with you on this! I always use the box method (area model) for teaching multiplication of polynomials. It reinforces the connections between multiplication and area, and helps students to make sense of these connections. 5^2 actually makes a square with side length 5, and x^2 makes a square with side length x. (Works for x^3 too if you have the 3-D models to help illustrate this). SOOO much better than FOIL because it actually means something and isn't just a trick to remember.
I generally begin by breaking 5 x 5 down into (3+2) x (4+1), and create a 2 x 2 box to represent this multiplication. This makes it natural to multiply (x+2)(x+7) in the same way, and then leads to factoring trinomials using the boxes. This also works in synergy with algebra tiles if you have them.
Using this method, I actually teach completing the square before factoring – and definitely before the quadratic equation – to solve quadratics. My students are very comfortable with this and generally prefer the boxes to the formula.
Oooh! I'm very intrigued by the idea of completing the square BEFORE factoring. Have you blogged about this?
As a matter of fact… http://17goldenfish.com/2015/03/21/quadratics-mighty-square-start-by-completing-the-square/…
I got the idea from James Tanton's approach, and had great success with this sequence last year – much better student understanding than when I have used the more traditional sequence. Would love to hear your thoughts about this.
Thanks for sharing! I have "pinned" to save for later! 🙂
I LOVE the box method. I was reviewing polynomials with some pre-calc students last year, and they taught it to me. I definitely learned the 'draw a bunch of arrows way', which worked for me but was not intuitive for my Alg 1 students. It's perfect for extending beyond 'FOIL'. I'm also intrigued by the comments on completing the square, which has been pushed to the side for my freshmen in the past. I should have more time at the end of the year this year, so I'm looking forward to a new approach to teaching solving quadratics.
Love when students teach us things!
There's an article in the March 2006 edition of The Mathematics Teacher explaining the method. I'm not sure if the author devised this method, but thank you very much to whoever did! I plan on teaching it to my Algebra 1 class this year! (Here's a link to the article, but unless you have access to the JSTOR database, you have to pay to download it. https://www.jstor.org/stable/27972037 )
Thanks Adina!
Looking forward to using this method to teach multiplying polynomials. I was taught with the FOIL method and sometimes those arrows just get confusing. I think this will really help. Thanks.
Please let me know how it goes!
GOOD POST
Thanks 🙂
I just found you blog, and it is helping me so much. I have purchased guided notes, but yours make is look so simple. I really like the idea of the box method versus the arrows. Thanks!